Imagine Imaging
Ages
8–18 years
Activity Time
Preparation: 5 minutes
Activity: 5–8 minutes
Group Size
Number of participants:
1 person per magnet
Ratio of facilitators to participants:
1 facilitator for every 4 participants
- Flat flexible refrigerator magnets are made of ferrite crystals sealed in plastic. The ferrite crystals are arranged to create a magnetic field that is strong on one side of the magnet and weak on the other side.
- While the surface of the magnet feels smooth, the arrangement of the ferrite crystals can be detected with another flat flexible magnet or a magnetic field viewer.
- Scientists and engineers invent and use tools to observe things beyond what our senses can see, hear, and feel.
- Scanning probe microscopy (SPM) allows people to observe the arrangement of atoms at the surface of a solid at the nanoscale level.
- Safety glasses are appropriate for this activity.
- Keep magnets away from electronics and data storage devices.
Questions to Investigate
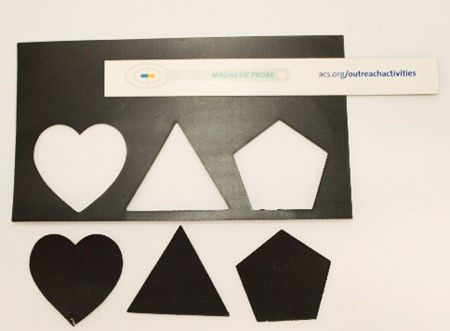
Can you align the three chemoji faces within the puzzle using only the magnetic probe?
Can you figure out which direction the bumps are arranged in each flat flexible magnet?
Per participant:
- One custom ACS Imagine Imaging magnet or at least two flat flexible refrigerator magnets
How to acquire an ACS Imagine Imaging magnet:- ACS store at www.store.acs.org, ACS member price is $9.00 for 10 magnets
- Several flat flexible magnets used to promote an organization, product, or service from a home refrigerator, optional
- Images of AFM renderings

Per table:
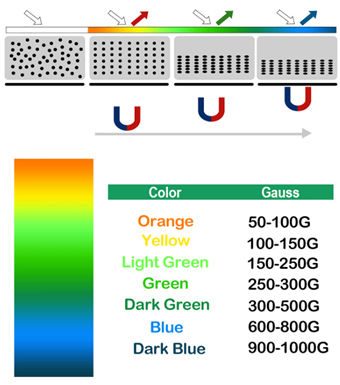
- Super magnetic field viewer with colors indicating strength in Gauss
- Graph paper or striped, gingham, or grid (reusable vinyl or cotton/poly) tablecloth
Prior to Activity
Prepare Materials
- Test your magnets ahead of time. Flat flexible refrigerator magnets will vary in how well they work. This may be due to, the size of the units in the Halbach array, or degradation of the magnetic field. Most magnets are printed either horizontally or vertically. Note that some shapes are printed at a diagonal or other orientation to reduce waste when printing multiple images on a large flat flexible magnet sheet.
On-Site
- Arrange three or four stations across the front of a 6- or 8-foot rectangular table.
- Place one Imagine Imaging magnet or a few rectangular flat flexible magnets at each station.
- Place the magnetic field viewer near the facilitator(s).
-
Introduce flat flexible magnets
Instructions
Tell participants:
- Flat flexible refrigerator magnets stick to each other or to steel. The sticker side does not stick to steel. Let’s explore another interesting property of flat flexible magnets.
Talking Points
- Do you have any flat flexible magnets at home?
- Are these magnets broken on one side?
No. They are made this way on purpose!
-
Have participants feel the magnet with their fingers first and then with the magnetic probe
Instructions
Direct participants to:
- Flip this magnet over.
- Slide your fingers across the magnet-side of both the flat magnet and the magnetic probe.
- Slide your hand from top to bottom across both magnets.
- Next, slide the magnetic probe across the magnet left-to-right and right-to-left.
- Slide the magnetic probe from top-to-bottom and bottom-to-top.
Talking Points
- Is the surface of the magnet smooth or rough?
Smooth - What do you notice when you slide the magnetic probe across the magnet?
It feels like there are bumps only if you swipe across, not in any other direction. - The bumps are kind of like speed bumps that go across a road. What direction do you think the “speed bumps” are going compared to the lines on the tablecloth.
-
Place the magnetic field viewer on the puzzle to reveal the pattern and direction
Instructions
Tell participants:
- You correctly observed the parallel lines before you saw them. You used the magnetic probe to figure out something that your senses of sight, hearing, and touch could not notice.
Talking Points
- How does seeing the magnetic field make you feel?
-
Place the puzzle and pieces face-down mix them up and solve the puzzle
Instructions
Direct participants to:
- Place the magnet face down and pop out the pieces so that they are also face down.
- Mix up the pieces.
- Try doing the puzzle face-down.
- Then flip it over to see how they did.
Help participants realize that the heart will fit only one way, but the triangle will fit three ways and that the pentagon will fit five ways. Only one is right!
Talking Points
- Are the chemoiji lined up?
Maybe - What is the problem with the triangle and pentagon?
While the heart can only fit one way, the triangle can fit in its space three different ways and the pentagon can fit five different ways. - Do you think that the magnetic probe will help?
Yes!
-
Use the magnetic probe to feel the direction of each piece to help complete the puzzle correctly
Instructions
Direct participants to:
- Try doing the puzzle face-down using the magnetic probe.
- Slide the probe L-R or R-L across the heart and from T-B or B-T
- Slide the probe parallel to each flat edge of the triangle and pentagon to find the direction with the “speed bumps.”
Talking Points
- Can you place the three pieces in the puzzle while everything is face-down?
-
Place the magnetic field viewer on the puzzle to check the direction of the magnetic field on the pieces
Instructions
- Allow participants to try again on pieces that might be misaligned.
- In the end, confirm that the pieces are aligned with the magnetic field viewer.
Talking Points
- Do you think that the pieces are aligned with the rest of the magnet?
-
Flip the puzzle over to check on the chemoji
Instructions
- Use the magnetic field viewer to help flip the puzzle over.
- When participants see that the chemoji are aligned, they will feel successful.
- Confirm that they used the magnetic probe to detect a pattern in the magnetic field that normally cannot be seen!
Talking Points
- How did you know which direction to place each of the pieces?
-
Compare the experience with the magnet to SPM
Instructions
Tell participants:
- When scientists can’t observe properties with their senses of sight, hearing, and touch, they invent tools to help them make their observations.
Clean Up
- Reset for more participants by placing one completed puzzle at each station. Return the magnetic field viewer to the facilitator.
- At the end of the session, collect the completed magnets and magnetic field viewers and place in a box.
- Fold and reuse the striped tablecloth or put away the graph paper for future science or math activities.
How are refrigerator magnets made?
To make a sheet of flat flexible magnet, manufacturers heat ferrite and plastic until the plastic melts. They mix them together well and then pour the mixture into a thin layer. While still wet, they bring a strong magnet close to the sheet. This magnetizes the ferrite crystals and moves them into a particular arrangement called a Halbach array. As the plastic cools, it locks the ferrite crystals in place.
Why doesn’t the sticker side stick to steel?
The Halbach array arranges magnetic north in in a pattern (left-up-right-down) so the magnetic field is strengthened on one side and cancelled out on the other. This is why flat flexible refrigerator magnets will not stick to steel or each other on the sticker side. It also means that manufacturers can use less ferrite to get a magnetic field that is strong enough to stick to steel, even with a couple of sheets of paper in between. The first Halbach array was designed to focus the beams of a particle accelerator.
Visually, one shape can fit only one way, another can fit three ways, and the third can fit five different ways. Using another magnet as a probe, participants can use their senses of touch and hearing to recognize a pattern in the magnetic field. When participants flip the puzzle over, they will see the complete image!
How do scanning probe microscopes work?
Scanning probe microscopy (SPM) allows people to observe atoms at the surface of a solid at the nanoscale level. It was originally invented to see the atoms in a sheet of silicon. Optical microscopes require light. Because silicon atoms are smaller than the smallest wavelength of visible light, the inventors had to discover a different way to detect atoms. They invented a type of SPM now called the scanning tunnelling microscope (STM) in 1981 and were awarded with the Nobel Prize in 1986 for their invention.
The tip of the probe of a SPM is so sharp that it is just one single atom thick. A lever holding the probe moves in response to the electron cloud surrounding each atom at the surface of the sample. Changes in the electron field of the atom on the probe are measured. The data collected is used to determine coordinates which appear as an image on a computer screen.
This is how scientists and engineers can visualize how atoms within molecules or ionic compounds are arranged at the surface of a sample. SPMs allow scientists and engineers to do research into electronics, materials science, microbiology, and data storage.
- ACS Office of Science Outreach
- Dr. Robin Tanke, member of the American Chemical Society’s Committee on Community Activities, author of the activity Imaging without Light in the Photography and Imaging: Picture Perfect Chemistry issue of Celebrating Chemistry and professor of chemistry at the University of Wisconsin – Stevens Point
- Atomic Force Microscopy featuring Dr. Jennifer MacLeod,
https://www.youtube.com/watch?v=jRAqhFdwt20 - The Microscope that can Actually See Atoms, SciShow
https://www.youtube.com/watch?v=S-M7JjYClTY - Why do refrigerator magnets only stick on one side? Michael Graham’s Engineer Dog blog
https://engineerdog.com/2015/03/12/why-do-refrigerator-magnets-only-stick-on-one-side/
Your magnetic field viewer may come with a card that interprets the colors seen on the magnetic field viewer as a range of gauss to approximate the strength of the magnetic field.
;void(0);)